When winter’s chill sets in, trailer home residents face the pressing issue of outdoor water pipes freezing, leading to costly repairs and unmanageable situations. Insulating these pipes is a game-changer, providing a protective barrier against frigid temperatures and minimizing heat loss. Not only does this simple yet effective solution safeguard your plumbing, but it also contributes to energy efficiency, keeping your home cozy and reducing utility bills. In this guide, we’ll share practical tips and steps to insulate outdoor water pipes in your trailer home, ensuring you stay warm and worry-free all winter long. Let’s dive into how you can protect your home and enhance your living experience!
Understanding the Risks of Frozen Water Pipes
Understanding the persistent threat of frozen water pipes is essential for anyone living in a trailer home, especially during the harsh winter months. The sudden drop in temperature can transform your plumbing system into a ticking time bomb, where water inside the pipes can freeze and expand, leading to cracking or bursting. This not only leads to costly repairs but can also result in significant water damage within your home, jeopardizing both your possessions and the structural integrity of the trailer itself.
To mitigate these risks, it’s crucial to understand where vulnerabilities lie. Outdoor pipes, which are often less insulated than those located indoors, are particularly susceptible. This can include exterior faucets, sprinkler systems, and the pipes leading to and from these fixtures. Failing to insulate these areas adequately can expose them to frigid conditions, especially if the pipes run along unheated or poorly insulated walls and foundations.
Moreover, the impacts of frozen pipes extend beyond immediate damage; they can lead to mold growth and compromise overall air quality within your home once the water begins to thaw and leak. Homeowners need to be vigilant about identifying at-risk sections of their plumbing. Regular checks on pipe insulation and applying preventive measures-like keeping cabinet doors open to allow warm air to circulate-can be the key to avoiding expensive issues down the line. By understanding these risks, trailer homeowners can take proactive steps to protect their homes from winter’s unpredictable chill. 1")
Essential Insulation Materials for Trailer Homes
When it comes to protecting your trailer home from the harsh realities of winter, insulation plays a crucial role-especially for your outdoor water pipes. The right insulation materials not only help prevent pipes from freezing but can also save you from expensive repairs and water damage down the line. Here are some essential materials every trailer homeowner should consider when insulating their water pipes.
Foam Pipe Insulation
One of the most popular choices for insulating water pipes is foam pipe insulation. It comes pre-sliced, making installation a breeze-simply wrap it around the pipes and secure it with tape. This material provides overall effective insulation and is available in various widths to fit different pipe sizes. It’s moisture-resistant, which is beneficial for areas prone to condensation. Moreover, the added layer helps reduce sound from water flow, which is a bonus in tighter living spaces.
Heat Tape
For particularly vulnerable pipes, heat tape can be an excellent addition. This electrical tape can be wrapped around pipes to provide consistent heat during extreme cold weather. When properly installed, it generates enough warmth to keep the water flowing and prevent freezing. However, it’s essential to follow manufacturer instructions closely to ensure safety, as improper use can lead to overheating or potential fire hazards.
Insulated Covers
Another great option is insulated covers or sleeves. These covers can be placed over faucet spouts, hose bibs, and other exposed pipe areas outside. They can effectively trap heat and keep the pipes warm, especially during overnight freezing temperatures. Many insulated covers are designed to withstand weather elements, making them ideal for outdoor exposure.
Spray Foam Insulation
For those hard-to-reach spaces or areas with irregular shapes, spray foam insulation can be a real lifesaver. It expands upon application, filling in gaps and creating an airtight seal around your pipes. This not only protects against freezing but also enhances energy efficiency within your trailer home by reducing drafts. Just be cautious where you apply it, as excessive foam can be difficult to remove later.
By choosing the right insulation materials, you can significantly reduce the risk of frozen pipes and the associated costs. Make sure to assess the specific needs of your trailer home based on its layout and local climate conditions. By taking these preventative steps, you can enjoy a much warmer and stress-free winter. 2")
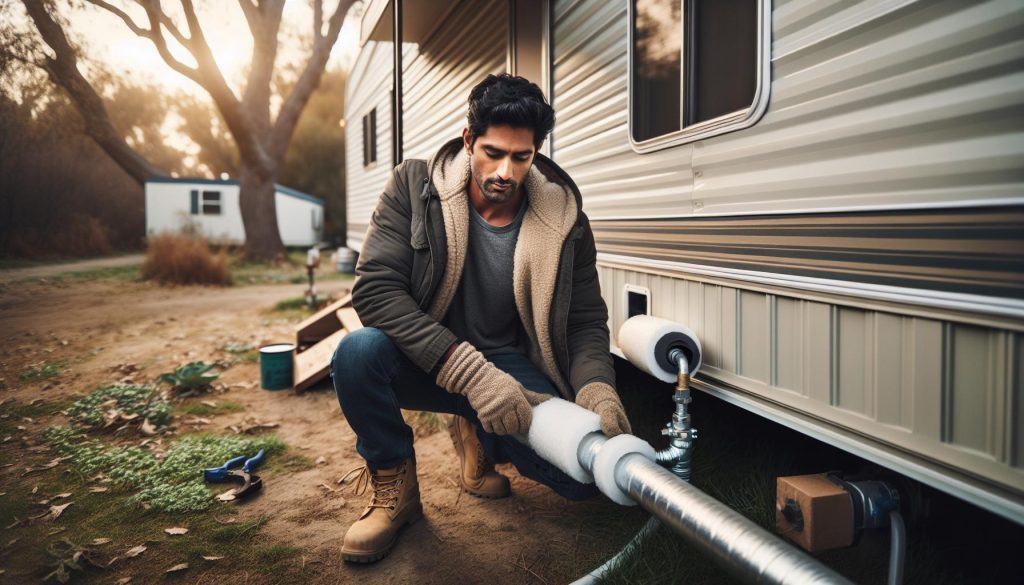
Step-by-Step Guide to Insulating Water Pipes
In colder climates, ensuring that your water pipes are insulated properly can save you from a costly mess come winter. Insulating your outdoor water pipes in your trailer home is not only a practical way to prevent freezing but also enhances the overall energy efficiency of your space. With the right tools and materials, this task can be tackled easily, equipping you for those harsh winter months.
Start by gathering your supplies, which should include foam pipe insulation, heat tape (if necessary for vulnerable areas), insulated covers, and sturdy tape or a utility knife. The foam pipe insulation is particularly beneficial as it’s designed to fit snugly around pipes and can be cut to size for different diameters.
Next, identify the pipes that need insulation. Common areas often include unheated basements or crawl spaces, exterior walls, and any pipes running along outside walls. Once identified, clean these pipes to ensure the insulation adheres properly. Now you can begin the installation:
Step-by-Step Installation
- Measure and Cut: Measure the length of each exposed pipe section and cut pieces of foam insulation to fit snugly over them.
- Apply Foam Insulation: Peel the backing off the adhesive side (if applicable) and carefully wrap it around the pipes, ensuring there are no gaps. Secure with tape for added security.
- Install Heat Tape: For particularly exposed or susceptible areas, wrap the heat tape around the pipe before applying the foam insulation. Follow manufacturer instructions meticulously to avoid any safety hazards.
- Add Insulated Covers: For outdoor spouts and faucets, use insulated covers, ensuring they are fastened securely to provide maximum protection against freezing temperatures.
Finally, a thorough inspection of your work is crucial. Ensure all sections are tightly covered and there are no exposed areas that could lead to freezing. Regular maintenance checks during the winter months can help you catch any potential issues before they escalate into severe problems.
With these practical steps, you’ll be better prepared to protect your water pipes throughout the winter, allowing you to focus on enjoying your cozy trailer home instead of worrying about plumbing issues. Outfitting your space with effective insulation will not only fend off frost but may also save on heating costs in the long run.
Best Practices for Insulating Outdoor Pipes
To keep your outdoor pipes in a trailer home safe from the dangers of freezing temperatures, implementing effective insulation strategies is essential. Outdoor pipes are inherently more exposed to the elements, making them vulnerable when temperatures drop. One of the best practices is to use a combination of insulation materials, which provides a robust barrier against cold air. Foam pipe insulation is highly effective; it is inexpensive and can be easily installed over pipes to create a snug fit. For additional protection from severe cold, especially in vulnerable areas, consider wrapping heat tape around the pipes before applying the foam insulation. This method not only prevents freezing but also ensures a more reliable flow of water when temperatures plummet.
Another critical aspect is to ensure no gaps exist between the insulation and the pipe, as even a small opening can expose the pipe to the frigid air and lead to freezing. When securing the foam insulation, use high-quality adhesive tape to hold the insulation firmly in place. For external faucets or spigots, using insulated covers can provide an extra layer of protection, effectively shielding them from frost. Remember to check these covers frequently, particularly before winter storms, to ensure they are secure and intact.
Alongside these physical insulating measures, it’s important to be proactive in monitoring your piping system. Regular maintenance checks can keep you ahead of any potential issues, allowing for swift action if problems arise. Being aware of the specific areas around your trailer home that are prone to cold, such as unheated basements or the exterior walls, can help better target your efforts. By following these practices, not only do you protect your plumbing against freezing, but you also enhance the overall efficiency and comfort of your trailer home during the cold winter months.
How to Identify Vulnerable Pipe Areas
Identifying vulnerable pipe areas in your trailer home is a crucial step in preventing water pipe freezes during the cold months. Pipes often reside in spaces that can easily fall below freezing temperatures, and knowing where these risks lie can save you from significant headaches later. Recognizing these areas enables you to take proactive measures, ensuring your plumbing stays functional when the temperature drops.
Start by inspecting the exterior walls of your trailer home, where pipes often run close to the surface and can be directly exposed to cold air. Pay special attention to any uninsulated areas, such as near windows and doors, as these can allow cold drafts to sneak in and chill the pipes. Additionally, areas that are underneath sinks, especially those along exterior walls, are typically at higher risk of freezing. Ensure the cabinet doors beneath sinks are insulated or left open during extremely cold weather to allow warmer indoor air to circulate around the pipes.
Other Common Vulnerable Areas
Another area to assess is the basement or crawl space. If your trailer has any basement-like areas, they are often unheated and can be colder than the rest of your home. Insulating both the pipes and the walls surrounding them can greatly reduce the chance of freezing. Additionally, check the exterior faucets and garden hoses, which are particularly susceptible to freezing. Use insulated covers and disconnect hoses to minimize exposure to the cold.
Consider the pipe materials as well. Metal pipes tend to conduct cold more rapidly than plastic, so if you have metal plumbing running through vulnerable areas, extra precautions are necessary. Regularly checking for any visible cracks or signs of damage on the insulation can also help catch potential issues early. Maintaining awareness of your trailer’s unique layout and the areas where plumbing is installed will guide you in determining the best insulation strategies and when to apply them.
Taking the time to identify these vulnerable regions will not only aid in preventing freezing but also enhance the overall resilience and efficiency of your plumbing system throughout the winter season. By preparing in advance, you ensure a warmer and more comfortable living environment.
Tips for Maintaining Pipe Insulation Year-Round
Maintaining effective pipe insulation year-round is essential for protecting your water pipes from freezing and potential damage, particularly in trailer homes where plumbing systems can be more vulnerable. Regular inspections and routine upkeep can extend the life of your insulation and avoid costly repairs later. Start by conducting a thorough check of all exposed pipes, particularly those in unheated spaces such as crawl spaces, basements, and along exterior walls. Look for any signs of wear or damage, such as cracks, moisture, or gaps in your insulation.
To ensure optimal performance of your pipe insulation, consider investing in high-quality materials that suit your specific climate. For trailer homes, insulation types like foam, fiberglass, or heat tape can offer different benefits depending on the location and susceptibility of your pipes. It’s also wise to wrap insulation tightly around joints and bends in the pipes, as these areas are often more prone to heat loss and freezing. Don’t forget to regularly clean the areas around your insulated pipes to remove dust and debris that can compromise insulation effectiveness.
Seasonal Adjustments
As temperatures change, adapting your maintenance routine becomes vital. During the colder months, keep the heat regulated inside your trailer to prevent drastic temperature drops around your water pipes. Adding insulation to areas like water meter pits and outdoor faucets can also further protect vulnerable points. Utilize insulated covers or kits specifically designed for these areas, which are easy to apply and provide a buffer against extreme cold.
In warmer months, conduct a comprehensive inspection to catch any damage caused by humidity or sunlight. Ensure that your insulation doesn’t become damp, as moisture can undermine its effectiveness and lead to mold or mildew growth. Replacing damaged sections promptly will not only help maintain your plumbing system but also create a healthier living environment.
By adopting these proactive strategies, you can significantly enhance the resilience of your trailer home’s plumbing system against temperature fluctuations and moisture issues. This attention to detail not only safeguards your pipes but also contributes to the overall comfort and longevity of your living space.
Emergency Fixes for Burst Pipes in Winter
Experiencing a burst pipe during winter is a homeowner’s nightmare, and it can cause significant damage if not addressed promptly. The first step in dealing with a burst pipe is to turn off the water supply to prevent further flooding. This can typically be done via the main shut-off valve located near where the water line enters your trailer. Once the water is off, begin to assess the damage. Look for the location of the burst and any signs of water pooling, which can indicate where the leak has occurred.
To temporarily control the leak, you can use a few common household items. A sturdy piece of plastic, such as a plastic bag, can be wrapped around the broken section of the pipe, secured with tape or even a rubber band. This makeshift barrier will help contain the water until a proper repair can be made. Additionally, if the rupture is small and accessible, you might use a pipe repair clamp or a sleeve specifically designed for emergencies. These can be found at most hardware stores and are easy to install.
Steps to Mitigate Damage
- Dry the Area: Use towels or a wet/dry vacuum to clean up any pooled water to prevent mold growth.
- Heat the Area: If the surrounding temperature is below freezing, use space heaters or heat lamps to warm the area and prevent more pipes from freezing.
- Keep the Area Ventilated: Open windows or doors if it’s safe to do so to allow airflow, which can help dry out moisture.
After addressing the immediate damage, it’s essential to contact a professional plumber to facilitate a permanent fix. They can assess the damage accurately and ensure the pipe is replaced or repaired according to local building codes. Remember, while DIY solutions can be effective temporarily, professional assistance is crucial for long-term safety and reliability of your plumbing system.
By staying calm and taking the right steps, you can manage a burst pipe situation effectively. This proactive approach not only helps in minimizing damage but also aligns with best practices for maintaining your home, especially during the unpredictable winter months.
Cost-Effective Solutions for Pipe Insulation
Insulating pipes properly is not just a luxury but a necessity for trailer homeowners, especially in regions that face freezing temperatures. The good news is that there are several cost-effective solutions available that can safeguard your plumbing system without draining your budget. Many of these methods can be implemented using readily available materials and techniques that don’t require professional installation, making them accessible for everyone-no matter your level of experience.
One straightforward solution to consider is the use of foam pipe insulation sleeves. These are inexpensive, easy to install, and highly effective in preventing heat loss. Simply measure the diameter of your pipes and cut the foam to size, then slip the insulation onto the pipes. For additional protection, especially in areas prone to extreme cold, you can secure the insulation with duct tape. Another method is to wrap pipes with heat tape, an electrical heating element that warms the pipe, ensuring that water doesn’t freeze. This requires care and clear instructions, but many types come with easy-to-follow setups.
If you’re looking for materials that might already be lying around your home, look no further. Old towels, blankets, or insulation from other projects can be repurposed for additional protection around exposed pipes. Wrap these materials securely around the pipes, then cover them with plastic or duct tape to keep moisture out. This DIY approach not only saves money but also helps you get creative with repurposing materials, which is an excellent practice in sustainable living.
Simple Steps for Cost-Effective Insulation
- Select Your Insulation Material: Consider foam pipe insulation for easy application, or use materials like towels or newspapers for an improvised approach.
- Measure and Cut: Measure the length of the pipes you need to insulate, and cut your chosen material accordingly.
- Secure the Insulation: Use duct tape or string to keep the insulation in place, ensuring it fits snugly against the pipe.
- Inspect Regularly: Check your insulation periodically, especially before and during winter months, to ensure it remains effective.
These cost-effective solutions not only protect your pipes from freezing but also extend the life of your plumbing, making them invaluable for any trailer home. Engaging in these practices allows homeowners to enjoy peace of mind during the colder months, all while saving money and enhancing the efficiency of their trailer home living.
DIY vs. Professional Insulation: Pros and Cons
When considering how to insulate outdoor water pipes for a trailer home, the decision between DIY solutions and hiring a professional can significantly impact your overall cost and effectiveness. Many trailer homeowners find themselves at a crossroads, weighing the pros and cons of each approach. While DIY insulation can be simpler and more budget-friendly, professional services bring expertise and assurance that can make all the difference during freezing temperatures.
Embarking on a DIY project often appeals to those looking to save money and engage hands-on with their home maintenance. By utilizing materials like foam sleeves or repurposed items such as old towels, homeowners can create effective insulation layers that prevent pipes from freezing. The satisfaction of completing a task yourself can also boost confidence in your home care skills. However, it’s essential to note that improper installation can lead to inadequate protection, potentially resulting in costly repairs if the pipes freeze or burst.
On the other hand, hiring a professional insulation service offers a level of precision and experience that unsupervised attempts may lack. Professionals understand the nuances of insulation materials, application techniques, and local building codes. This expertise can ensure that your pipes are adequately protected against extreme cold, potentially avoiding the headache of future plumbing issues. However, the cost of professional services can be significant, which may make this option less appealing for those on a tight budget.
When weighing these options, consider the following factors:
- Budget: DIY insulation materials are generally cheaper, but weigh this against potential future repair costs if installation isn’t effective.
- Skill Level: Assess your comfort with home improvement tasks; confidence can influence your decision on whether to DIY or hire help.
- Time: DIY projects require time for measurement, installation, and potential troubleshooting; professional services usually offer faster completion.
- Long-term Value: Consider the longevity and durability of the insulation-professionals may use higher-quality materials and techniques than DIY options.
Ultimately, whether you choose to insulate your pipes yourself or through professional means should align with your skills, budget, and time constraints. Each option has valuable benefits tailored to fit various homeowner needs, allowing for effective solutions against the weary cold.
Long-Term Benefits of Proper Insulation
Proper insulation of outdoor water pipes offers numerous long-term advantages that can significantly enhance the functionality and comfort of your trailer home. For instance, insulated pipes not only safeguard against freezing during harsh winter months but also contribute to energy efficiency year-round. By minimizing heat loss from hot water pipes and preventing the entry of cold air into hot water systems, you can enjoy reduced utility bills and a more consistent temperature throughout your home.
When water pipes are adequately insulated, the risks of costly repairs due to bursts or leaks decrease dramatically. Frozen pipes can result in significant water damage, mold growth, and extensive repairs that strain both your time and budget. Investing in quality insulation materials upfront can help you avoid these potential catastrophes. Additionally, properly insulated pipes minimize the chances of lower water pressure and supply interruptions during extreme weather conditions, ensuring a reliable water system all winter long.
Moreover, insulated pipes can directly impact the lifespan of your plumbing system. By protecting pipes from the damaging effects of temperature fluctuations, you reduce the risk of corrosion and deterioration over time. This can lead to fewer plumbing issues, extending the life of your entire water system and reducing long-term maintenance needs. As a result, you can enjoy peace of mind knowing that you’ve equipped your home with a durable and efficient plumbing infrastructure.
In summary, the include enhanced energy efficiency, lower utility costs, reduced repair expenses, and prolonging the life of your plumbing system. By taking the time to ensure your outdoor pipes are well-insulated, you’re making a wise investment in the comfort and sustainability of your trailer home.
Choosing the Right Insulator for Your Climate
Choosing the right insulation for your outdoor water pipes is critical to safeguarding your trailer home against the harsh effects of winter. The right materials can keep your pipes from freezing, ultimately saving you from costly repairs and significant inconvenience. When selecting insulation, consider your local climate conditions, the common temperatures you experience, and how exposed your pipes are to the elements.
For areas that experience extreme cold, fiberglass insulation is a popular option. It provides excellent thermal resistance and can be wrapped around pipes to keep the heat in and the cold out. However, be sure to check the insulation’s R-value-this indicates its effectiveness. Another effective material is foam pipe insulation, which is lightweight, easy to install, and highly effective in maintaining consistent temperatures around your pipes. Self-adhesive styles simplify the application process, allowing for quick insulation without the need for additional materials.
In regions that encounter milder winters but still face occasional freezing temperatures, reflective insulation can be an effective choice. This type of insulation reflects heat back towards the pipes, minimizing heat loss. Additionally, consider heat tape for especially vulnerable sections of piping. This electrical tape can be wrapped around pipes to provide extra warmth during severe cold spells, ensuring they stay functional even in the harshest conditions.
Ultimately, the key to effective insulation lies not only in the choice of materials but also in proper application. Ensure the insulation fits snugly around the pipes, covering any joints or vulnerable areas. Regularly check the insulation for wear, especially after severe weather, to maintain its efficacy. By carefully selecting and applying the right insulation, you can protect your plumbing from winter’s wrath and maintain a warm and comfortable trailer home.
Additional Measures to Prevent Pipe Freezing
When temperatures drop, taking proactive steps to prevent water pipes from freezing becomes essential, especially in trailer homes where pipes may be more exposed to the elements. Understanding how to shield your plumbing system can save you from costly repairs and ensure a comfortable living environment, even in the harshest winter conditions.
One effective strategy is to let faucets drip slowly during extreme cold spells. This constant flow of water can help prevent pressure buildup in the pipes, which is a common cause of freezing. Furthermore, consider cabinet doors under sinks open during frigid weather to allow warmer air from the home to circulate around the plumbing. It’s a simple yet effective measure that can significantly reduce the risk of frozen pipes.
Insulating the exterior of your trailer not only benefits your pipes but also maintains the overall temperature inside. You can use materials like foam board insulation around the base and skirting of your trailer to create a barrier against cold winds. This enhances your heating system’s efficiency, ultimately saving on energy bills while providing an extra layer of protection for your water lines.
Additionally, regular maintenance checks are crucial. Inspect your plumbing system before winter sets in to identify any areas prone to freezing. Use thermal imaging equipment or consult with a professional to pinpoint vulnerabilities. Being proactive about these measures not only helps in preventing frozen pipes but ensures a comfortable, worry-free winter in your trailer home.
Key Takeaways
Now that you’ve learned how to effectively insulate outdoor water pipes for your trailer home, take action today to protect your plumbing from winter freezes. Ensuring you have the right insulation not only saves you from costly repairs but also enhances your overall living experience. If you’re looking for more tips on maintaining your mobile home or need step-by-step guides on common repairs, check out our articles on “Winterizing Your Trailer Home” and “Essential Maintenance for Mobile Homes.”
Don’t hesitate to share your experiences in the comments below or explore our resource section for tools that will make your home improvement projects easier. Make sure to subscribe to our newsletter for the latest updates and exclusive tips on trailer living. Your comfortable, well-maintained home is just a few clicks away, so stay informed and prepared for any season ahead!