Installing a breaker box in your trailer home is essential for ensuring electrical safety and efficient energy management. Did you know that improper wiring can lead to serious hazards, including electrical fires? Many trailer home residents seek to enhance their living space, but tackling electrical improvements can feel daunting. This guide will demystify the installation process, empowering you to create a safe and dependable electrical system. Whether you’re upgrading an old box or installing a new one, learning the steps involved is not only practical but crucial for your peace of mind. Let’s explore how you can take charge of your trailer’s electrical needs confidently!
Understanding the Importance of Electrical Safety in Mobile Homes
Many mobile home residents may not realize that electrical safety is even more critical in these unique dwellings compared to traditional homes. With often older wiring systems and construction practices, mobile homes can present specific hazards that require vigilant attention to electrical safety. Poor wiring connections or outdated breaker boxes can lead to electrical fires, malfunctions, or even electric shocks. Understanding these risks can empower residents to take necessary precautions and make informed decisions when it comes to their electrical systems.
It’s essential to regularly inspect not only the visible electrical components such as outlets and cords but also the breaker box itself. A malfunctioning breaker or outdated box can compromise the safety of your entire electrical system. Homeowners should consider periodic professional inspections to check for common issues like exposed wires, faulty connections, or any signs of wear and tear. For instance, it is crucial to avoid overloading circuits, which is a major cause of electrical fires. Safe practices include ensuring that all appliances are properly rated for the circuits they are plugged into and avoiding the use of extension cords as a permanent solution.
Adhering to safety standards and local regulations is non-negotiable when dealing with mobile home electrical systems. Many jurisdictions have specific codes designed to ensure the safety of these unique living environments. By staying informed and educating themselves about these regulations, homeowners can avoid costly mistakes and ensure their home is safe for all occupants. Prioritizing electrical safety not only protects the physical structure of the mobile home but also ensures the well-being of its residents, creating a secure living atmosphere that allows for enjoyable and stress-free home life.
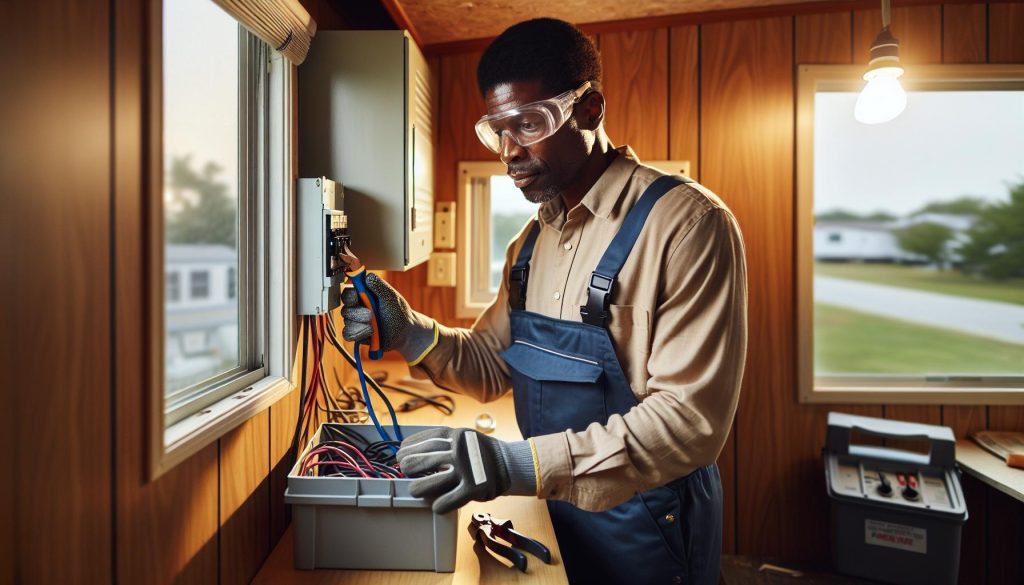
Essential Tools for Installing a Breaker Box
Installing a breaker box in a trailer home can be a straightforward task, but having the right tools on hand is crucial for ensuring safety and effective installation. Utilizing appropriate equipment not only makes the process smoother but also helps prevent potential hazards associated with improper installations. Below is a comprehensive guide to the essential tools you will need to tackle this important project confidently.
To begin with, ensure you have basic hand tools readily available. These include:
- Phillips and Flathead Screwdrivers: Essential for securing the breaker box and making necessary adjustments.
- Wire Cutters and Strippers: These tools will help you prepare your wires to the appropriate length and remove insulation when needed.
- Needle-nose Pliers: Perfect for bending wires and reaching tight spaces during installation.
Next, invest in some specialized tools that can enhance your safety and efficiency:
- Voltage Tester: This is a must-have to check that power is off before starting any electrical work, ensuring that you avoid any electrical shocks.
- Multi-Meter: Useful for measuring voltage, current, and resistance, allowing you to troubleshoot potential issues later on.
- Circuit Breaker Finder: This handy tool helps locate and identify specific breakers in your panel, simplifying maintenance or troubleshooting in the future.
In addition to hand tools, some larger equipment may be necessary for the installation process:
- Drill with Various Bits: Essential for creating holes in the wall for mounting your breaker box securely.
- Level: Ensure your breaker box is installed straight, which is critical for both functionality and aesthetics.
Lastly, don’t forget about personal protective equipment (PPE):
- Safety Glasses: Protect your eyes from flying debris or accidental sparks during installation.
- Insulated Gloves: Wearing these helps reduce the risk of electric shock and keeps your hands safe while working with live wires.
Gathering these tools and ensuring you have everything prepared before starting your project can make a significant difference in the ease and safety of your installation. By being well-equipped, you empower yourself to handle the task effectively, making your trailer home a safe and comfortable place to live.
Step-by-Step Guide to Installing Your Breaker Box
 1")
Installing a breaker box in your trailer home is a critical step for ensuring a safe and efficient electrical system. By following a systematic approach, you can confidently embark on this project, making your living space safer and more comfortable. Here’s a simple yet detailed guide to navigate through the installation process.
Begin by shutting off the main power supply to your trailer to ensure safety. This is a crucial step to prevent electrical shocks or accidents while working on the breaker box. After confirming the power is off with a voltage tester, remove the old breaker box if necessary by unscrewing it from the wall and disconnecting the wires. Make sure to label the wires to maintain clarity for reinstallation.
Next, choose an appropriate location for the new breaker box, considering accessibility and proximity to your main power line. Install the new box at a height that is convenient but also adheres to local electrical codes. Secure the box to the wall using screws and ensure it is level, as a misaligned box can complicate future maintenance.
With the breaker box securely in place, it’s time to connect the wires. You will typically connect the incoming wires to the main bus bars, which may include a hot (live) wire, a neutral wire, and a ground wire. Use wire cutters and strippers to prepare your wires as needed. Make sure to tighten the connections securely and follow the color-coding convention (usually black or red for hot, white for neutral, and green or bare for ground).
After connecting the wires, it’s time to install circuit breakers into the panel. Choose breakers based on the specific demands of your electrical system and home layout. Each circuit should have a properly sized breaker to protect against overloads. Snap the breakers into the designated slots within the breaker box and ensure they fit snugly.
Once everything is connected and in place, carefully replace the cover on the breaker box. Turn the main power supply back on and test your new setup. Use a multimeter to check that the voltage is within proper limits and that each breaker functions correctly. This validation step is essential for troubleshooting any issues that may arise.
Finally, document your installation process for future reference. Keeping a record of the wiring setup and breaker configurations can be immensely helpful for any future electrical work or inspections. By following these steps carefully, you not only enhance the safety and functionality of your trailer home’s electrical system but also empower yourself with valuable skills for maintenance and troubleshooting.
Choosing the Right Breaker Box for Your Trailer Home
 2")
When it comes to ensuring a safe and efficient electrical system in your trailer home, selecting the right breaker box is essential. A well-chosen breaker box not only protects your electrical circuits from overloads but also acts as the central hub for directing power throughout your home. A good breaker box will accommodate your specific electricity needs based on the size of your trailer, the number of circuits required, and the types of appliances you typically use.
One of the primary factors to consider is the amperage rating. Most trailer homes typically operate on a 100-amp service, which is sufficient for lights, appliances, and outlets in standard-sized units. However, larger trailers or those with multiple heavy-duty appliances might require a 200-amp service. Choosing a breaker box with the appropriate rating ensures that it can handle your electrical load without risk of overheating or tripping.
Another crucial aspect is the number of circuit slots available in the breaker box. Evaluate your current and future electrical needs to determine how many circuits you might need. If you plan to add additional appliances or renovations, consider a panel with extra slots to avoid the hassle of upgrading later. For safety, ensure that the breaker types are compatible with the box; common types include single-pole and double-pole breakers, depending on your needs.
It’s also important to consider the brand and quality of the breaker box. Investing in a reputable brand can ensure better reliability and lower chances of malfunction. Look for boxes that meet local codes and standards, which often involve certifications from organizations such as UL (Underwriters Laboratories).
Lastly, take into account the location and installation of the breaker box. Ensure it’s accessible for both operation and maintenance. The installation should adhere to local electrical codes, which may dictate specific guidelines pertaining to mobile homes. Consulting with a professional when in doubt can save time and provide peace of mind that your electrical system is safely configured.
In summary, making an informed decision when choosing a breaker box is critical to maintaining a safe electrical system in your trailer home. By carefully evaluating your needs in terms of amperage, circuit capacity, product quality, and installation requirements, you’ll enhance not only the functionality of your electrical setup but also the overall safety of your living environment.
Common Mistakes to Avoid When Installing Electrical Systems
 3")
When it comes to installing electrical systems in trailer homes, a few common pitfalls can compromise safety and efficiency. Many people underestimate the importance of adhering to local electrical codes and regulations, which are designed to protect residents from hazards such as overloads and electrical fires. Failing to consult these codes can lead to improper installations, potentially resulting in fines or hazardous living conditions. It’s essential to familiarize yourself with these regulations before beginning any electrical project.
Another frequent mistake is neglecting to calculate the total load your electrical system will need to support. Inadequate amperage ratings and insufficient circuit slots in the breaker box can lead to overheating and frequent tripping. Always take inventory of all appliances and electrical devices you plan to use, and consult a professional if you’re unsure of your electrical requirements. For trailer homes, which often have unique layouts and electrical needs, this step is crucial to ensure a safe and functional setup.
Additionally, many installers forget to properly secure wiring and fittings. Loose wires can create shorts or connections that cause power loss, and they increase the risk of electrical fires. Use quality materials and follow best practices for securing and protecting wiring. This includes using conduit where necessary and making sure that all connections are tight and insulated.
Lastly, it’s important to remember that testing your new electrical system is non-negotiable. After installation, take the time to ensure that everything is functioning correctly before using your electrical appliances. Regular maintenance checks will help catch and mitigate any potential issues early, ensuring safety and longevity for your trailer home’s electrical system. By avoiding these common mistakes, you can create a safe and efficient living environment that meets your electrical needs and enhances the comfort of your trailer home.
How to Connect Wiring Safely and Efficiently
Connecting wiring safely and efficiently is essential for maintaining both the integrity of your breaker box installation and the overall safety of your mobile home. Poorly connected wires not only run the risk of causing electrical hazards but can also lead to appliance damage and increased energy costs. To ensure a secure connection, it’s important to follow a systematic approach, utilize proper techniques, and understand the essential components involved in the process.
Before you start connecting any wiring, always ensure that the power is turned off at the main breaker. This precaution is vital to prevent electrical shocks. Once you’ve confirmed that the power is off, prepare your workspace by gathering the necessary tools, such as screwdrivers, wire strippers, and pliers. You’ll also need the right type of wire for your breaker box-which will typically be either copper or aluminum-with sizes that match the amperage requirements you previously calculated.
Steps for Safe Wiring Connections
- Strip the Wire: Use wire strippers to remove about ¾ of an inch of insulation from the ends of each wire you plan to connect. This ensures a clean connection without damaging the metal conductor.
- Twisting Wires Together: For connections that require twisting two wires together (like when connecting to a circuit), align the stripped ends and twist them tightly together using pliers. The connection should feel secure and not wiggle.
- Connecting to Terminals: For connecting to terminals on the breaker box, align the stripped wire with the terminal and ensure the wire is securely fastened with the appropriate fastening mechanism, typically a screw. Tighten it firmly to avoid any potential loosing over time.
- Use Wire Connectors: When connecting multiple wires, use appropriate wire connectors (also known as wire nuts) to cover and secure twisted wires. They help ensure a strong connection and provide insulation.
- Insulate Exposed Wires: Make sure that no metal is exposed after making connections. Use electrical tape or heat-shrink tubing to insulate any exposed ends, providing an additional layer of safety.
After all connections are made, carefully organize the wires to avoid any crossing or tangling, which can create future headaches or hazards. Be sure to check that all wires are properly secured, as loose connections can lead to arcing and increased risk of fire.
Post-Connection Testing
Once you’ve completed the wiring, it’s essential to test your connections. Re-energize the system by turning the main power back on and check for any tripped breakers or unusual smells, which might indicate a problem. Using a multimeter can help you confirm that power is correctly flowing through your breakers.
Engaging in a well-planned, step-by-step approach not only ensures the safety of your electrical system but also promotes efficiency, comfort, and peace of mind in your mobile home living experience. Properly connected wiring is a cornerstone of a reliable electrical setup, enabling you and your family to enjoy your space safely for years to come.
Testing and Troubleshooting Your New Breaker Box
After you’ve installed your new breaker box, the next crucial step involves testing and troubleshooting to ensure everything operates smoothly and safely. Think of this phase as a health check for your electrical system, vital for preventing small issues from escalating into larger, potentially unsafe problems. Proper testing not only reassures you of your installation’s integrity but also enhances the overall safety of your home environment.
Begin the testing process by restoring power to the breaker box. Turn on the main power supply carefully and observe any immediate reactions. Check for tripped breakers as this could indicate a faulty connection or excess load on the circuit. If you notice any breakers that trip immediately upon being reset, this suggests a wiring issue or a short circuit that needs addressing. In this case, turn off the power again and inspect all connections and wire placements to ensure that no wires are pinched or incorrectly connected.
Utilizing a multimeter can significantly aid in diagnosing potential problems. Set the multimeter to AC voltage and test the voltage at the breaker terminals. You should ideally see a reading close to the breaker’s rating, typically 120V or 240V depending on your setup. If the reading is zero or significantly lower than expected, it is crucial to investigate further. Check the connections and wiring continuity from the breaker to the load it powers. Additionally, examine the ground and neutral connections to confirm they are secured correctly.
If your tests reveal consistent issues, consider some common troubleshooting steps. Here are a few critical actions to take:
- Check for Overloads: Ensure that no single circuit is overloaded. Distribute your electrical loads evenly across circuits if necessary.
- Inspect Wiring Connections: Loose connections can create resistance, generating heat that could lead to circuit failures. Tighten any loose wires you find.
- Look for Damage: Visually inspect the wiring for any signs of wear, such as fraying or burnt areas, which can indicate deeper problems.
- Consult a Professional: If troubleshooting does not resolve the issues, don’t hesitate to contact a licensed electrician. Their expertise can save you time and enhance safety.
By taking the time to test and troubleshoot your new breaker box, you can confidently ensure the safety and efficiency of your trailer home’s electrical system. Regular maintenance and checks can help prevent future issues, giving you peace of mind as you enjoy the comforts of your alternative housing. Remember, a well-functioning electrical system is central to creating a safe and welcoming living environment.
Maintaining Your Breaker Box for Long-Term Safety
Maintaining the integrity of your breaker box is crucial for the long-term safety and functionality of your trailer home’s electrical system. A well-maintained breaker box ensures that your electrical circuits operate efficiently and minimizes the risk of hazards, such as electrical fires or outages. Regular maintenance checks can go a long way in preventing minor issues from becoming significant problems, helping you maintain a safe and comfortable living environment.
Start by establishing a regular maintenance schedule, ideally every six months or more frequently if you notice any signs of trouble. During these inspections, look for any physical damage to the breaker box, such as rust, corrosion, or loose connections. Keep the area around the breaker box clear of clutter and debris to ensure proper ventilation and easy access in case of an emergency. It’s vital to turn off the main power before starting any inspection to ensure your safety while handling electrical components.
Another essential aspect of maintenance involves tightening any loose connections. During use, connections may become loosened over time. Use a screwdriver to gently tighten the screws on the breakers and any terminal connections. Additionally, checking the wiring for any signs of wear or fraying can help catch potential issues early. If you notice any deterioration in your wiring or components, it’s best to consult a licensed electrician to perform any necessary repairs or replacements.
Tips for Ensuring Ongoing Safety
- Label Your Breakers: Clearly label each breaker in your box to identify the circuits they control. This can be invaluable during emergencies or maintenance.
- Monitor Electrical Load: Keep track of how much electrical load each circuit is carrying. Avoid overloading circuits, and distribute appliances evenly to prevent overloads.
- Invest in Surge Protectors: Adding surge protectors can safeguard your appliances from voltage spikes, which can otherwise damage both your electronics and wiring.
- Consult Professionals: If you feel unsure about any maintenance task, don’t hesitate to call a licensed electrician. Regular professional inspections can catch issues you may overlook.
By taking these proactive steps, you can extend the lifespan of your breaker box and enhance the overall safety of your trailer home. A commitment to regular maintenance not only adds peace of mind but also contributes to creating a secure and enjoyable living space where you can focus on the things that matter most.
Upgrading Electrical Systems: When to Call a Professional
When it comes to upgrading the electrical systems in your trailer home, knowing when to call in a professional can be crucial for both safety and functionality. Electrical upgrades can enhance your living environment, but improper installation or modifications pose risks like electrical fires, system malfunctions, and serious personal injury. It’s essential to recognize scenarios that warrant professional expertise to ensure your upgrades are safe and compliant with local regulations.
One of the main indicators that it’s time to consult a licensed electrician is if your current system struggles to meet your household’s power demands. If you’ve noticed frequent tripped breakers or flickering lights, it could signify that your breaker box is inadequate for your electrical load. Also, if you are planning to add significant electrical appliances, such as HVAC systems, water heaters, or additional outlets, professionals can help assess your existing setup and ensure it can handle the increased demand. They can also recommend necessary upgrades to your breaker box or wiring to accommodate these changes without compromising safety.
Additionally, if you are considering a complete overhaul or installation of new systems-such as switching from a 100-amp to a 200-amp service-hiring an electrician is highly advisable. Upgrades of this magnitude involve not only installing new equipment but also ensuring that your entire electrical system meets current building codes and safety standards. Navigating these regulations can be complex and time-consuming, and a licensed professional has the experience to manage these tasks correctly.
Finally, if you suspect issues during your maintenance checks-such as unusual odors, sparks, or hot surfaces-these signs can indicate serious electrical problems. In such cases, you should immediately consult a professional rather than attempting repairs yourself. They can quickly identify the source of the problem, make necessary repairs, and help prevent potential hazards from escalating further.
In summary, while many electrical tasks can be tackled by DIY enthusiasts, understanding your limitations is key to maintain a safe and efficient home. By calling in professionals when necessary, you ensure your trailer home’s electrical systems are reliable, safe, and compliant, allowing you to enjoy your living space without worry.
Understanding Local Codes and Regulations for Mobile Homes
When upgrading the electrical systems in your trailer home, understanding local codes and regulations is paramount to ensuring both safety and compliance. Each area may have specific requirements for electrical installations, particularly with manufactured homes, that must be adhered to. These codes not only outline the technical specifications for electrical systems but also protect homeowners by reducing the risk of electrical hazards, such as fires and electrocution.
Local building codes often dictate the types of materials and equipment that can be used, as well as installation practices. For instance, regulations may require that only certified electrical wiring is installed, and breakers must match the amperage needs of your circuits. It is vital to consult local government resources or a licensed electrician to access the precise requirements for your area. Compliance with standards such as the National Electrical Code (NEC) is commonly mandatory, ensuring that installations meet the minimum safety criteria.
On top of state and national regulations, mobile home parks may have additional rules governing the installation of electrical systems. These specific rules can include the maximum distance a breaker box can be located from power sources or guidelines for grounding methods. Familiarize yourself with both state regulations and any specific policies from your park to avoid fines and ensure your home is up to code.
Failure to adhere to these codes can lead not only to unsafe living conditions but also to costly corrections and potential legal issues. Therefore, conduct thorough research before beginning any electrical projects. It’s advisable to have a licensed electrician review your plans before starting, as they can provide valuable insights into compliance and safety, ensuring that your home remains a secure and comfortable space.
Emergency Preparedness: What to Do After an Electrical Failure
In the event of an electrical failure in your trailer home, staying calm and knowing the steps to take can make all the difference. Whether it’s a tripped breaker, flickering lights, or a complete power outage, a proactive approach is essential for safety and effective resolution. First, always prioritize safety: ensure your surroundings are safe before investigating the issue. If you notice a burning smell, hear popping sounds, or see smoke, evacuate the area immediately and call emergency services.
Start by checking your breaker box. If a circuit breaker has tripped, this could be the culprit. Simply flipping the switch back to the “ON” position may restore power. However, if the breaker continues to trip, it may indicate an overloaded circuit or a short circuit necessitating further investigation. It’s crucial to note any trends-have appliances been working overtime, or is a specific item causing issues? Keeping a journal of electrical failures can help identify potential patterns.
Next, inspect your appliances and outlets. Disconnect devices one at a time to see if the situation improves, signaling an issue with a particular appliance. Look for any signs of damage at outlets or plugs, such as scorch marks, which could pose hazards. If you feel unsure about any findings, it’s always wise to consult a professional electrician.
Create an Emergency Plan
It’s beneficial to have an electrical emergency plan in place. This includes having essential items readily available, such as:
- Flashlights and batteries
- Portable phone chargers
- First aid kit
- Water supply and non-perishable food in case of prolonged outages
Establishing an alternate lighting system can also be helpful, especially if power failures are frequent in your area. By being prepared, you can ensure that you and your family remain safe and comfortable during unexpected electrical outages.
To further safeguard against future failures, consider organizing regular checks of your electrical system and ensuring that installations adhere to local codes. Investing in smoke and carbon monoxide detectors can provide an additional layer of safety, alerting you to hazards early. Remember, while some issues may seem minor, they can escalate if not addressed promptly. If you find yourself frequently facing electrical challenges, it might be time to consult a licensed electrician for a comprehensive system evaluation, ensuring your home remains safe and secure for you and your family.
In Retrospect
Installing a breaker box in your trailer home is crucial for ensuring electrical safety and maintaining a secure living environment. Remember that following the right steps not only protects your home but also enhances the longevity of your electrical systems. If you have questions or need further guidance, don’t hesitate to explore our in-depth articles on Essential Electrical Safety Tips and DIY Wiring Projects for trailer homes-both are great resources to expand your knowledge and confidence.
Act now! Proper electrical setup is vital for your safety and comfort, so if you haven’t already, consider subscribing to our newsletter for more expert tips and resources delivered straight to your inbox. Additionally, if you’re looking for tools to assist you in managing your trailer home, check out our guide on Essential Tools for Trailer Home Maintenance. Stay safe and empowered in your home, and we hope to see you back here for more valuable insights and helpful tips soon!